Chapter 2-Adding a unit
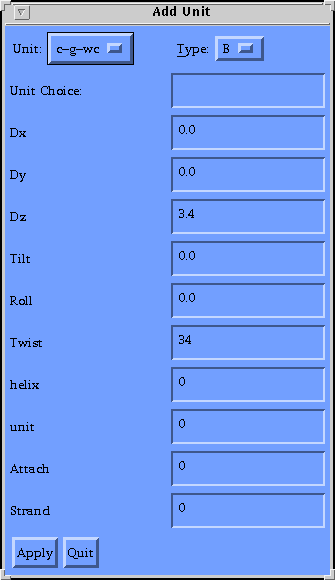
The Add unit popup is accessed by choosing "Add unit" from the Advanced menu.
The popup: 
The popup:
- The Unit menu-This is a menu of the first ten units in the unit
library. An entry in the "Unit Choice" field will be used preferentially
over a "Unit menu" entry.
- Type menu-This is used to determine the type of the helix being
generated. "A","B", and "Z" are the possible choices. When one is selected
the unit parameters will adjust accordingly. B-type helix is the default.
- Unit Choice field-This is used to access units that are not in the
unit menu. An entry here is used preferentially to the "Unit menu".
- Dx field-This field allows the user to specify the shift of the unit.
- Dy field-This field allows the user to specify the slide of the unit.
- Dz field-This field allows the user to specify the rise of the unit.
- Tilt field-This field allows the user to specify the tilt of the
unit.
- Roll field-This field allows the user to specify the roll of the
unit.
- Twist field-This field allows the user to specify the twist of the
unit.
- Helix field-This field allows the user to pick which helix the unit
is added to.
- Unit field-Allows the user to pick the location in a given helix to
insert the unit.
- Attach field- This field tells the program how to make the backbone
connection. This takes a M:C:G specifier for each
base in the unit. The specifier will be the group(s) that occupy
that space in the helix prior to insertion.
- Strand field-This is used to specify the strand direction. "0"
indicates 5'->3'. "1" indicates 3'->5'
- Apply button-This executes the operation as specified.
- Quit button-This closes the "Add unit" popup.
Examples
Making an anti-parallel helix
- Start NAMOT2 and raise the "Add unit" popup
- Pick a unit from the Unit menu. (e.g.,"a-t-wc").
- Pick a form from the Form menu. (e.g, the default B-type).
- Click over apply. The unit should appear in the main window.
- Repeat steps 2 through 4 to continue adding units to the helix.
See figure 2.1
Making a parallel stranded helix.(I)
- Start NAMOT2 and raise the "Add unit" popup
- Pick "ta-rwc" from the "Unit" menu.
- Choose a form from the "Type" menu.
- Since this unit is by default parallel, no other change is needed, enter
Apply and continue as desired.
See figure 2.2
Making a parallel stranded helix.(II)
- Start NAMOT2 and raise the "Add unit" popup
- Pick a Watson-Crick unit from the menu.
- Choose a form from the "Type" menu.
- In the strand field, enter "1 1"
- Click on apply twice in order to produce a 2 unit helix.
- In this particular case the, the backbone connections are not possible
with the default sugar orientations.
To correct this
- Click on the first sugar with the leftmost mouse button
- Click on the ending sugar with the middle button.
- Choose "chi" from the Sugar controls menu.
- Enter 180 in the amount field and press return.
This should allow the backbone connection to be made.
See figure 2.3
Inserting a unit into a pre-existing helix.
NAMOT2 allows the user to place a unit into a pre-existing helix.
An example of this is below.
- Create a duplex as in the first example.
- Select a different unit so you can locate the change, I suggest using the
complementary pair.
- Chose helix 1 and unit 2.
- Enter the attachments. For a 4 unit polymer, these will be "1:1:2 1:2:3"
- Click on "Apply".
See figure 2.4
